 In my Bring Your Book to Life® Program, I teach how to write a book quickly. A quality book, of course. And quickly is a relative term. We’re not doing it in a weekend!
Start at the Beginning to Write a Book Quickly
I just love beginnings—getting in touch with the vision of a book, thinking deeply about future readers, seeing what’s possible.
So, I’m having a ball meeting with the participants in Bring Your Book to Life® as they embark on an 8-12 week journey of writing their books swiftly, many planning to complete a first draft by the end of the course.
Because we focus on writing the foundation (usually a first draft or first draft with holes) of a truly excellent book in a short period of time, it requires us to be efficient and effective in all we do. We don’t cut corners, but we work strategically.
What does this look like? Here are a few outtakes from book concept consultations that took place in the last few days:
[bctt tweet=”Write a Book Quickly: Break it Down and Don’t Over Complicate” username=”LisaTener”]
It’s easy to try to invent something new, but if you already have a system that works, use what you have. One call was with an expert who has over a million visitors to her website. She clearly knows who her audience is and how to engage them! Plus, she’s taught much of this information before in a course.
It makes sense to use the structure from her existing course; it works! I can’t tell you how many times, though, I see people starting over with their book. Now, it’s not a bad idea to ask yourself, “Is this the most effective structure and format to get this information across?” but don’t change things just to change things.
I first suggested she use the steps of the course as her chapters. The challenge is that there are only 5 steps, making her projected chapter lengths 35 pages. This seemed way too long for her harried audience. It turns out, though that each step has around four modules, making 4 chapters in each of 5 sections–20 chapters, each around eight to nine pages. That seems like a good length for a busy audience.
Leave the Time-consuming Parts for Last When Possible

I found myself repeating something you may have heard me say before: if you’re an expert, sharing a system you already know well, or if you’re writing a memoir, you can often write from what you know and write a first rough draft with relative ease.
You can leave the extensive research or interviews for last and fill them in after you have a first rough draft. This can prevent “analysis paralysis” which can keep you in research mode way too long, and it can also give you the much needed momentum to feel confident to complete the book quickly, rather than taking so long to complete one chapter that you give up.
Of course, there may be places where research or interviews are absolutely necessary. However, think first before research and decide whether you can write from what you know and research later.
In addition, if you get stuck on one chapter, consider skipping that chapter and moving on to the next part of your outline or—perhaps even better—writing the chapter you feel most excited about writing next! Generally, a solid outline will help you work effectively and efficiently without having to write in a particular order. Sometimes, writing out of order frees your writing and creativity up in other ways.
When to Write Your Introduction
Should you write the introduction first?
It depends.
If you need to spend some time getting clear about your readers’ needs, mindset and pain points, writing the introduction and addressing these can help you get closer to your readers in preparation for writing the next chapters.
And as you describe the book, its contents, its benefits and how to engage the material effectively, you’ll get more clarity that will help you write.
On the other hand, the introduction can often be an experiment that you try a few different ways until you hit the right note. In that case, it’s preventing you from getting that quick rough first draft of the book. If you begin writing the introduction and you feel as if you’re treading water, consider moving on and returning to it later, so you can write your book expeditiously. If you already have a solid outline for the book, chances are writing several iterations of the introduction is not going to get you much additional clarity on that first draft. Keep moving.
Are there exceptions to the rules? Always. That’s why I recommend listening to your gut instinct as well (or “consulting your muse,” as I think of the creative source).
[bctt tweet=”How to Outline a Book” username=”LisaTener”]

One thing I’ve found myself suggesting to a few people in class is, if you’re writing a book that’s prescriptive (rather than narrative) or a combo of prescriptive/narrative, consider creating a blueprint for a typical chapter.
It can be something like this (just as an example):
- quote
- story
- tie story to teaching/information; provide info on xyz; define terms, share what research shows, etc.
- sidebar (can be science-y sidebar or a brief example/story or defining a term, etc.)
- provide questions for reflection and/or checklist and/or exercises or something else for readers to use for assessment and engagement, to integrate and apply the information
- possible action step for reader
So, if you are getting ready to write and want to write a book quickly, consider this first. It will help shape chapters and save you time.
Walking the Talk
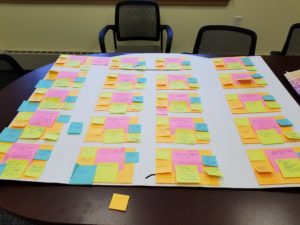
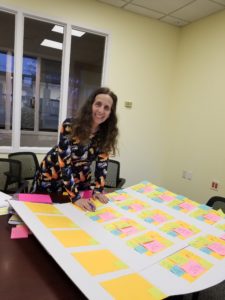
 I spent the past Saturday and Sunday afternoon at the Jamestown Library outlining my book. While I have a first draft written, it’s helpful for the developmental editing process to have various aspects/features/elements on color-coded Post-it notes and be able to move things around.
Note: it was a little challenging to keep the Post-it notes in place. Don’t try this on a windy day! (or if you do, make sure they are secure).
Although I plan to move some of these around, I ended up taping them down for now since they started to fall off. A particpant in class gave me the tip to buy sticky notes that are sticky all over the back and not just on one edge! I will definitely do that next time!
How About You?
Are you starting a book? What’s working? What questions are coming up? Do you have any insights or tips to share for getting started, writing a book quickly, getting the voice just right or writing your best?


I enjoyed your article on outlining. I find it pretty fascinating how other writers’ creative juices flow including what method they finally decide on. I’m an avid user of sticky notes but, I use them differently. I use the color code system to leave myself reminders and action task notes on my monitor. I tried many ways to outline unfortunately I have the attention span of a ghat which requires me to move around my home or yard often during the outline & throughline stage. Today I use a king-size teacher planner to outline in erasable color pencils. I’ve enough pages to plan out various books within a series and plot out bothersome plot bunnies when needed. Easy to view. Plenty of space to write. I use yellow heavy-duty stickies to scene dialogue. I can take it to the library, local cafe or to my sofa and bed. As much as I love poster boards they are awkward to deal with and move around.
hi Alma,
That sounds brilliant!
Is a teacher planner like a white board (I’m only seeing notebooks on Amazon when I search).
Lisa
This is the one that I use… https://www.amazon.com/dp/B00PUZ9A1K/?coliid=I16K5TRM6R5E4F&colid=21G1M4QLWNR8I&psc=1
I use the smaller stickies & writable highlighter sticky tabs so I can color code my characters or beats. In the first few pages, I use them to track my progress, my goals & reminders I like to keep handy. I like to keep a page for my one-page story details that I shrunk for quick review. You can design your planner any which way that suits your creativity and writing process. It will work for fiction or non-fiction writing. It opens to a wonderful 11×13 workspace as you edit or create and folds away nicely. I would share what mine looks like but I can’t paste images… sorry.
Great article! I’m currently finishing my sixth novel and I’ve been thinking of finally writing a non-fiction book that has been in my head for several years now. The blueprint looks like a great way to rapidly fill out my chapters. One thing I do (and you might consider) is using Scrivener to create your first draft. The program has a “corkboard view” which allows you create the equivalent of post it notes that can be freely arranged on your screen. The “notes” are tied to the chapters so moving a note automatically moves the actual text to the new location. So you can arrange things in a variety of ways to see what works best for you. it’s fun to play with, especially at the beginning of a new book when things need to be fluid as your thoughts organize themselves.
Thanks for the tip, David. Maybe I’ll finally try Scrivener again. I bought it and a package of tutorials and even started a book with it, but I got intimidated and went back to word…your description makes me think I should try again!